
Have you ever watched a heavy rainstorm turn your yard into a miniature water park? The water rushes down slopes, carving mini-canyons in your topsoil, only to pool uselessly in the street or wash away into the storm drain.
When water runs off your land, it takes your best soil and nutrients with it. But what if, instead of shedding that water as quickly as possible, you could capture it, slow it down, and sink it deep into the ground to feed your trees and garden beds?
Enter the berm and swale system nature’s favorite way to harvest rainwater right in your backyard.
The Dynamic Duo: What Are Swales and Berms?
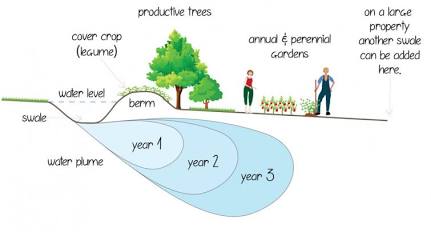
Think of a swale and a berm as a partnership. They are constructed along the contour of your landscape (meaning they run horizontally across a slope, keeping a level elevation).
-
The Swale: This is a shallow, level-bottomed ditch designed to catch runoff. It doesn’t drain water away like a traditional ditch; instead, it holds the water temporarily, allowing it to slowly infiltrate the earth.
-
The Berm: This is a mound of soil or organic material built directly on the downhill side of the swale. It acts as a soft barrier, stopping water from escaping and encouraging it to pool in the swale.
As water collects in the swale, gravity pulls it straight down. This creates an underground reservoir of moisture a water plume that keeps the surrounding soil hydrated for weeks, even during dry spells.
Why This System is a Game-Changer for Your Yard
By intercepting runoff, you unlock three major benefits for your garden:
-
Deep Watering: Instead of superficial watering that evaporates in a few hours, the slow sink of a swale hydrates the deep subsoil. Deep-rooted plants, perennials, and fruit trees will tap into this moisture reserves, making them incredibly drought-resilient.
-
Soil and Nutrient Retention: Fast-moving water is an erosion hazard. By slowing the flow, sediment and organic matter settle to the bottom of the swale, enriching your soil instead of washing away.
-
Passive Irrigation: Once established, a well-placed berm-and-swale system reduces your reliance on hoses and sprinklers. You let the sky do the heavy lifting.
The Secret Weapon: Shredded Cedar Mulch in Self-Supporting Meshes
Traditional dirt berms can be prone to eroding themselves during heavy storms if they aren’t fully covered in grass or plants. That’s why many smart gardeners rely on organic mulch barriers.
Using shredded cedar mulch packed into flexible, self-supporting mesh sleeves (often called mulch socks or wattles) is an absolute game-changer. Here is why this method works so brilliantly:
-
Rot Resistance: Cedar is naturally packed with oils that resist decay. Unlike other woods that break down into mush in a single season, shredded cedar stands up to moisture for years.
-
Structural Stability: When shredded cedar is packed into a mesh tube, the interlocking fibers knit together. The mesh acts as an external skeleton, preventing the mulch from washing away even in high-volume downpours.
-
Superior Filtration: Rather than acting like a brick wall, a mesh-bound cedar berm acts like a giant sponge. It slows water down and filters out sediment while letting clean water slowly weep through.
-
Erosion Control: You can lay these mesh-bound cedar tubes right along the downhill lip of your swale or terrace them down steep slopes. Over time, plants will grow their roots directly through the mesh and into the decomposing mulch, locking the structure permanently into your landscape.
4 Steps to Building Your Own Water-Harvesting System
Ready to start catching rainwater? Here is a simple, step-by-step roadmap to get you going:
A Quick Safety Warning: Never build swales directly next to your house foundation, or on slopes steeper than 15-20% without consulting an engineer. You want to sink water into your garden, not your basement!
By pairing the time-tested physics of swales with the resilience of self-supporting cedar mulch berms, you can turn your yard into a self-watering, soil-building oasis. Your plants and your water bill will thank you.